Chapter 5. Setting Up Your Printer
Most new Red Hat Linux users want to immediately set up their printer.
Here, we'll cover some basic steps to configure a parallel printer on your system. For the most part, the process isn't too complicated, regardless of whether you're using GNOME or KDE.
 | Is it compatible? |
|---|---|
Although many printers work well with Linux, not all printers are compatible. To make certain your printer is compatible with Linux, refer to The Hardware Compatibility List at http://www.redhat.com/support/hardware/. Another useful site which features printer compatibility lists as well as useful hints and instructions is The Linux Printing HOWTO, at http://www.linuxprinting.org/howto/. |
Because Linux is a multi-user, multi-tasking operating system, it can handle a variety of printing jobs at once. You could have multiple users on the system, all of whom want to send their work to a printer. Linux dutifully handles these requests by spooling them -- storing and printing the files in the order in which they were received.
Even if you're the only user on your system, you're still going to send your work to the print spool, where the files wait until it's their turn to be printed.
There are some terms and conditions you should know:
lpd -- The line printer spooler daemon. Normally starts when the system starts. Manages the print jobs.
lpr -- Takes each print job and submits it to lpd.
Input filters -- Manage printer-specific formatting.
/etc/printcap -- This is the configuration file which defines your printer and other specifics.
/var/spool/lpd/ -- This is the location of the print spool, which is where files await printing.
Printtool -- A graphical utility you will use to configure and modify /etc/printcap.
 | Read the "man page" |
|---|---|
You can learn more about lpd and related commands and daemons by typing man lpd at a shell prompt. To move forward through the man page, use the Space; to move back, press the B key, and to quit, press the Q key. |
Regardless of whether you're using GNOME or KDE, you can configure your printer with Printtool. Printtool provides a graphical means for setting up and managing your printer.
Using Printtool
The file /etc/printcap defines how lpr should process the print jobs. If you were to take a peek at the file, you'd find it looks something like the following excerpt:
##PRINTTOOL3## REMOTE POSTSCRIPT 600x600 letter {} PostScript Default 1
acct|xerox-ac:\
        :sd=/var/spool/lpd/acct:\
        :mx#0:\
        :rm=xerox-ac.redhat.com:\
        :rp=lp:\
        :if=/var/spool/lpd/filter.d/filter:
|
It's not pretty, and unless you know exactly what you're doing, you shouldn't edit the file. Instead, use the utility Printtool to set up the printer (and /etc/printcap) for you.
To use Printtool, you'll have to "be root."
Whenever you make changes to your system configuration -- such as adding or modifying hardware settings, installing or uninstalling software -- you must be superuser, or root.
To become root from your user account:
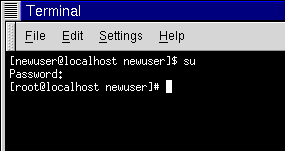
Open an Xterm window;
Type su at the prompt;
Type your root password. (You won't see it "echoed" on the screen when you type it.)
See Figure 5-1 for an example of how to become root.
As you can see in the previous figure, when you're root your prompt changes from a $ to a #. Type printtool -- one word, without capitalization.
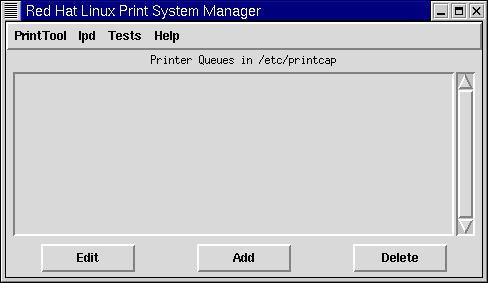
When the utility starts, you'll see a window similar to Figure 5-2. At first, you won't find any printers listed, because you haven't added a printer to /etc/printcap.
Click on the Add button to add your printer.
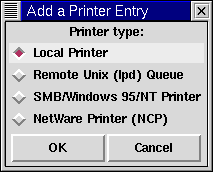
Next, you'll be asked what kind of printer you want to add (see Figure 5-3).
Choose from the following:
Local Printer: Choose this if your printer is directly connected to the machine on which you're working (called the local machine).
Remote Unix (lpd) Queue: A printer attached to another machine on which an lpd daemon is running. Choose this if you want to print to a network printer on a LAN.
SMB/Windows 95/NT Printer: A printer which is attached to a machine running Windows or Samba. (Samba is a suite of programs which allows Windows machines to share files and services with UNIX and Linux machines on a network.)
NetWare Printer (NCP): A printer on a machine running Novell NetWare or compatible server software -- two networking applications for interacting with machines running Novell NetWare.
 | What is a daemon? |
|---|---|
You may have seen that lpd is called the line printer spooler daemon. A daemon is a small program that runs in the background. Daemons usually perform critical system tasks, and usually start when the system starts. (Most daemons, also, have names that end in a d, such as crond, httpd, lpd, and so on.) |
For this example, we'll add a local printer. Highlight the entry Local Printer and select the OK button.
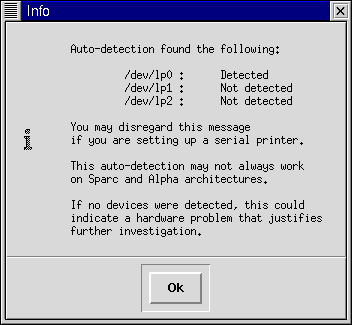
When you select your printer type, Printtool will attempt to detect any printers which are attached to your parallel port; you'll then see the results (see Figure 5-4). Click on the OK button to continue to the main Printtool window.
 | The /dev/lpx Device Files |
|---|---|
Linux refers to parallel ports differently than DOS. In DOS, a printer located at LPT1 is known in Linux as /dev/lp0; LPT2 in DOS is /dev/lp1 in Linux, and so on. |
In our example, a parallel port printer was detected at /dev/lp0. Click on the OK button to continue.
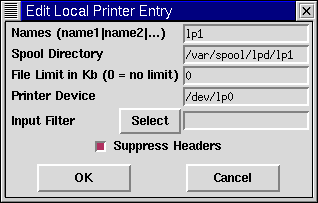
In the next dialog (see Figure 5-5), you can specify details about your printer, such as a name of the printer and its related spool directory, the location of the printer device and other options.
In the Names field, you can specify a name for your print queue (where print jobs are sent), and the default directory to which you want the jobs sent (the Spool Directory entry). You can probably leave these settings unchanged; note that giving a printer entry the name lp makes it the default printer.
The Input Filter contains information about your specific printer and its formatting requirements. To add your printer's information, click on the Select button. The Configure Filter dialog will open.
Once the Configure Filter dialog opens, your tasks are to perform the following:
Pick an exact match for your make and model printer in the Configure Filter dialog. If you can't find an exact match, see if you can find a match that's close (such as the same manufacturer, but a different model). Select other options, such as paper size and resolution. Click on OK to accept your selections.
Click on OK in the Edit Local Printer Entry dialog; you'll return to the Print System Manager.
Highlight your new printer entry in the Print System Manager dialog, then restart lpd from the menu.
Finally, with your printer highlighted in the Print System Manager, print a test page by selecting the option from the menu.
If you're unsuccessful at printing the test page -- or you need to modify the way it printed -- return to the Configure Filter dialog to select a different filter or change settings for your current filter.
If you're experiencing trouble, remember to check The Hardware Compatibility List and the The Linux Printing HOWTO, cited in the beginning of this chapter.
Selecting Input Filters
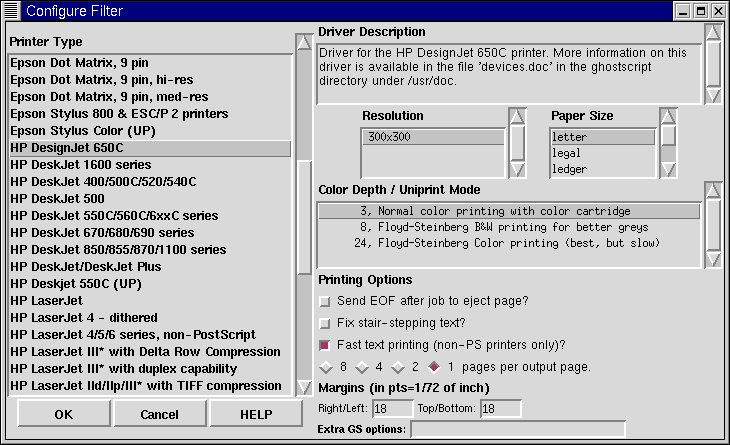
The Configure Filter dialog will look similar to Figure 5-6. Select the appropriate filter for your printer. When you select a filter, you're selecting the correct way to convert file formats so that your printer can use them.
The filter dialog is divided into several sections:
Printer Type: Lists the available printer models for which you have drivers.
Driver Description: Describes basic information about the driver, as well as the types of models for which the driver is appropriate.
Resolution and Paper Size: Allow you to specify the quality of output to the printer, as well as the default paper size in the paper tray.
Color Depth/Uniprint Mode: Allows you to specify additional resolution options for a color printer.
Printing Options: Allows you to modify how jobs are printed.
In the Printer Type pane, at left, choose the exact make and model listed for your printer. If you can't find an exact match, try to find the closest match to your printer's make and model.
If you have questions about which filter may be appropriate for your printer, you'll find information about the driver in the box called Driver Description, at the right of the dialog.
Quite a few makes and models of printers are supported, but not all printers are fully supported -- or supported at all. In some cases, printers may require additional drivers; in other cases, the printer may be unsupported by Red Hat Linux. Again, refer to the Hardware Compatibility List at http://www.redhat.com/support/hardware/ to verify that your printer is supported under Red Hat Linux.
If you find the manufacturer of your printer, but not your model number, you can check your printer's documentation to find out whether your printer can emulate any of the listed printers. You may also be able to find out whether a filter is suitable for your unlisted model by highlighting the filter in the left window and reading its description in the Driver Description window, at the right of the dialog.
Choose the resolution and default paper size for your printer. (Not all printer types will offer optional paper sizes.)
In the Color Depth / Uniprint Mode section, select the options you desire.
 | A little about Floyd-Steinberg |
|---|---|
Floyd-Steinberg refers to a process of dithering, which is used to create shades or to smooth jagged lines. |
Other Printing Options
The remainder of the Configure Filter dialog allows you to specify other printing options:
Send EOF after job to eject page -- This option forces the printer to eject the page when the print job is finished. Uncheck this option if you receive an extra blank page after your print job.
Fix stair-stepping of text -- Choose this option if your test page shows uneven lines of text, referred to as stair-stepped, which looks like:
This, for example,
                   is what stair-stepped
                                          text might look like
Fast text printing (non-PS printers only) -- If you don't have a PostScript printer, you can select this option, which will send text files directly to the printer, rather than send them to a program for conversion to PostScript, and then to Ghostscript to be printed. This option bypasses such a route for your text files, and speeds the process.
8, 4, 2, 1 pages per output page -- This option refers to the command mpage, which allows you print multiple pages of plain text files on one page (either 2, 4, or 8). This can be useful for squeezing large printouts onto a single sheet of paper. Note, however, that this option is not available if you choose the "fast text printing" option.
Margins -- This option specifically applies to the selection of multiple page printing. If you choose to print multiple pages (see the option above), you can specify the width of the margin on the page. If you choose to print single pages, this option will be unavailable to you.
Extra GS options -- Refers to additional Ghostscript options which may be available for your printer. In general, you can leave this blank. Check in the Driver Description box for any options you might be required to add here.
Testing Your Printer Configuration
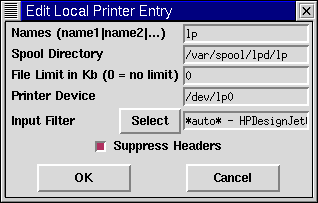
Once you've made your selections in the Configure Filter dialog, click on the OK button. You'll return to the Edit Local Printer dialog. Now, the Input Filter field will contain the information you'd chosen about your printer (see Figure 5-7).
Leave the item Suppress Headers checked by default if you don't want extra data printed with your documents (such as the date and origination of the print job).
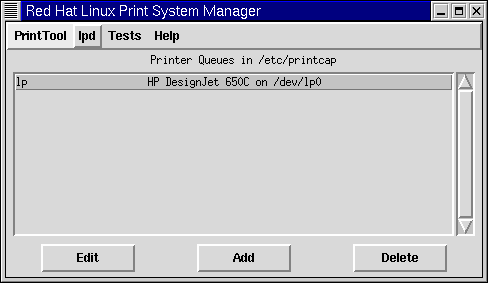
Click the OK button to continue; you'll return to the opening dialog of Printtool; this time, with your printer entry, as in Figure 5-8.
Now, it's time to test your setup.
Restart lpd -- Restart the printer spooler daemon by selecting lpd => Restart lpd from the menu.
Print a test page by highlighting your printer entry, then selecting Tests => Print ASCII test page (you can perform a test print on a PostScript test page, as well).
If you want to make modifications to your printer selection, highlight the printer and select Edit at the bottom of the Printtool window.
When you're satisfied with your configuration, you can exit by selecting Quit from the PrintTool menu, or by clicking on the x in the upper right of the application's window.
Once you return to your prompt, you can exit from the root login by clicking on the x in the upper right of the Xterm window, or by typing exit at the prompt. Then, type exit again to close the Xterm.
