Buying a Certificate
After you've generated a CSR, you need to send it to a CA.
Purchasing a Certificate From VeriSign
First, you'll need to decide which certificate you'd like to purchase. See the section called VeriSign Certificate Packages for a description of VeriSign's certificate products.
Once you've decided on the one you want, go to http://www.verisign.com/server/. Select the certificate that you want to buy.
The purchase process is somewhat standardized. In this document, we'll go step-by-step through the process of purchasing a Secure Site certificate, but you should be able to use the instructions to purchase another type of certificate.
For Secure Site certificates, you can choose a Two Year Option (if that's what you want) and confirm the location of your secure server. Click on Continue when you're finished.
The next page is Preparing for Enrollment. This page provides a summary of the information that you'll need to provide to VeriSign. Read through this page and make sure that you have the necessary information ready before you continue with the application process. When you're finished, click on the Continue button at the bottom of the page.
The next page is CSR: Wizard: Verify Distinguished Name. If you have not already generated a key and CSR according to the instructions provided in the section called Generating a Key and the section called Generating a Certificate Request to Send to a CA, do so now. Then select I have already prepared a CSR for this enrollment and click on Continue.
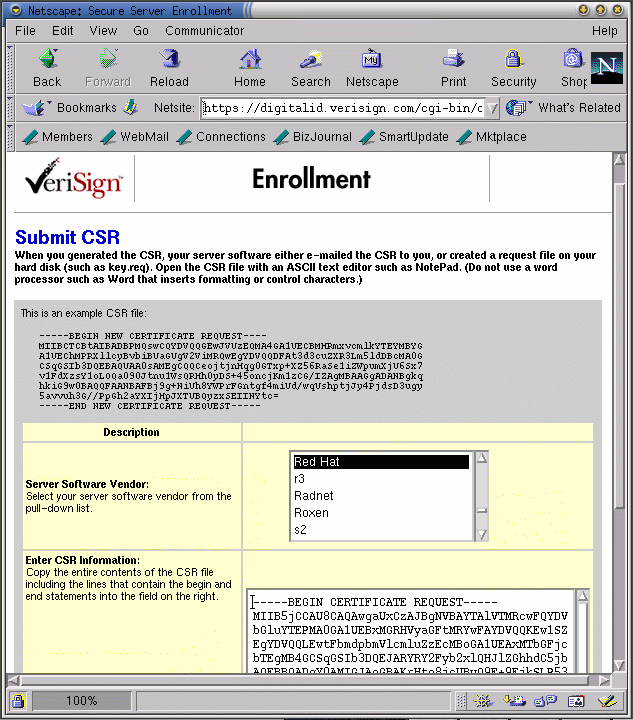
The next step, Submit CSR, is shown as Figure 11-1. Select Red Hat from the Server Software Vendor list.
Paste the contents of your CSR into the Enter CSR Information text box. To cut and paste the contents of the file (if you're using X), first cd to /etc/httpd/conf/ssl.csr. Display the contents of server.csr with the cat server.csr command. Highlight the contents of the file by clicking and dragging with your left mouse button. Left click on the text box on the Web page. Click the middle mouse button to paste the highlighted text.
When you're copying and pasting the CSR, be careful not to copy any extra empty or white spaces before or after the text (including the -----BEGIN CERTIFICATE REQUEST----- and -----END CERTIFICATE REQUEST----- lines). CAs have been known to reject CSRs which include those unwelcome spaces.
After you've successfully pasted in the CSR, click on Continue.
The next step is to Provide Proof of Right. This means that you need to prove to VeriSign that your organization is legitimate. VeriSign first attempts to match the organizational name you provided in the Dun & Bradstreet database. If your organization was found, select it. If your organization was not found, select My company and/or my company's correct address is not displayed in this list. Click on Continue.
The easiest way to prove your organization's identity to VeriSign is to provide them with your D-U-N-S number, but there are other ways if you don't have a D-U-N-S number or you don't want to use one. Refer to the instructions provided by VeriSign if you need to prove your organization's identity with something other than a D-U-N-S number. You'll need the proof, ready for submission to VeriSign, before you can apply for a certificate. Once you have the required documents, continue with the enrollment process.
After selecting the correct organization from the Dun & Bradstreet database list and clicking on Continue, the next page is Confirm Domain Registration. On this page, VeriSign is checking to see if your domain is registered to your organization. For more information on registering a domain name, see the InterNIC FAQ at http://www.internic.net/faq.html and/or ask your network administrator.
Your domain name must be registered to your organization. So, the Organization name listed in domain registry should be the same as the Organization name you entered. If they are not the same, you'll probably need to create a new CSR which includes the correct information.
In most cases, the two fields will be the same, so you can select These organization names match and then click on Continue.
The next page should congratulate you on passing VeriSign's initial validation checks. Click on Continue.
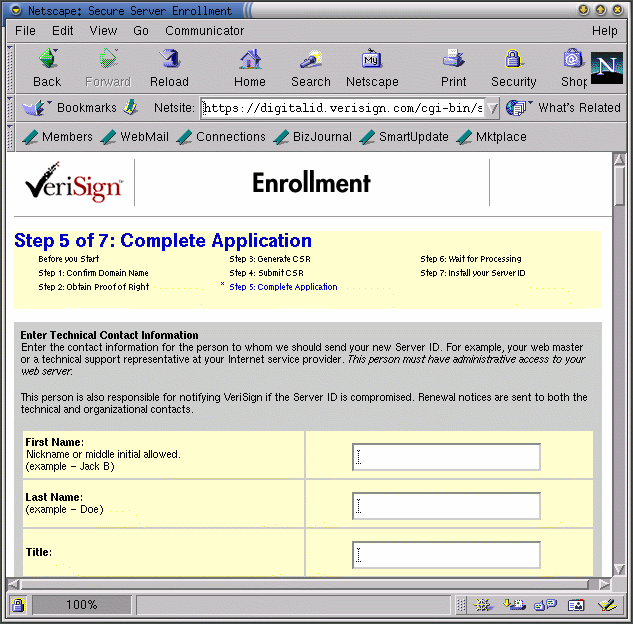
The next page, Complete Application, is shown as Figure 11-2.
Fill in the Enter Technical Contact Information section with information about your Red Hat Linux Secure Web Server's administrator or webmaster.
Fill in the Enter Organizational Contact Information section with the appropriate information, according to the instructions provided by VeriSign.
Fill in the Enter Billing Contact Information with information for the person who will be contacted for billing purposes.
Type a "challenge phrase" and a "reminder question" into the area provided. You may be asked for your challenge phrase if you ever need support from VeriSign, so be sure to record it and keep it someplace safe.
Indicate how you are going to pay for your certificate.
Read the subscriber agreement at the bottom of the page. After you've read the agreement, click on the Continue button at the bottom of the page. Your application will be submitted.
After you've successfully completed your enrollment form and your information and payment has been provided to VeriSign, they will authenticate your organization's identity and issue your certificate. When your application has been approved, they will send your certificate by e-mail to the technical and organizational contacts you provided.
Save the certificate VeriSign sends you in the file server.crt in /etc/httpd/conf/ssl.crt/. Follow the steps outlined in the section called Testing Your Certificate to install your certificate.
Purchasing a Certificate From Thawte
To purchase a certificate from Thawte, follow these instructions:
Point your browser to http://www.thawte.com/certs/server/request.html, where Thawte provides an overview of the necessary steps.
The first thing you need to do is gather the documents that they require, as discussed in both the section called Proving Your Organization's Identity to Thawte and the aforementioned Web page.
The next step is to generate a key and a certificate signing request (CSR). If you followed the instructions contained in the section called Generating a Key and the section called Generating a Certificate Request to Send to a CA, you already have a key (/etc/httpd/conf/ssl.key/server.key) and a CSR (/etc/httpd/conf/ssl.csr/server.csr). If you did not already create your key and certificate request, do so now using the instructions provided in this document.
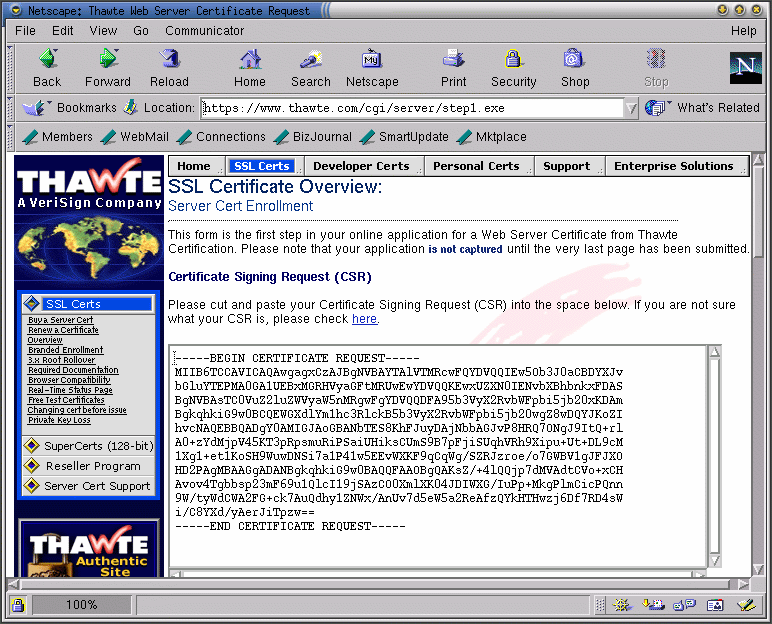
Go to Thawte's Buy a Certificate Web page at https://www.thawte.com/cgi/server/step1.exe. Select SSL Server Certificate. Click on the Next button at the bottom of the page.
The next page is Server Cert Enrollment. Paste the contents of your /etc/httpd/conf/ssl.csr/server.csr file into the Certificate Signing Request (CSR) text box, shown in Figure 11-3.
To cut and paste the contents of the file (if you're using X), first cd to /etc/httpd/conf/ssl.csr. Display the contents of server.csr with the cat server.csr command. Highlight the contents of the file by clicking and dragging with your left mouse button. Left click on the text box on the Web page. Click the middle mouse button to paste the highlighted text.
When you're copying and pasting the CSR, be careful not to copy any extra empty or white spaces before or after the text (including the -----BEGIN CERTIFICATE REQUEST----- and -----END CERTIFICATE REQUEST----- lines). CAs have been known to reject CSRs which include those unwelcome spaces.
Choose Red Hat Secure Server from the Web Server Software pull-down menu.
Choose how you want to pay for the certificate.
Click on Next at the bottom of the page.
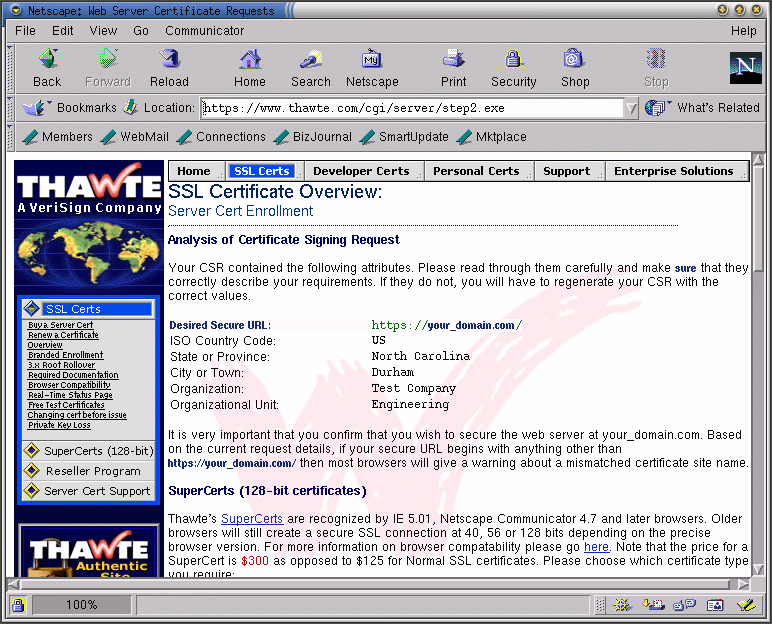
The next page displays an Analysis of Certificate Signing Request, shown as Figure 11-4.
Scroll down the page to Background Information, where you need to select a description for your organization from the pull-down menu, or type your own description into the text box provided.
If you have a D-U-N-S number, type it into the text box under DUNS Number.
Review Thawte's Subscriber Agreement. Fill in the required information for the person in your organization who will be authorize the Subscriber Agreement, as described in the section called Proving Your Organization's Identity to Thawte.
Under Technical Contact/Webmaster, fill in contact information for your Red Hat Linux Secure Web Server's administrator or webmaster.
Click on the Next button at the bottom of the page.
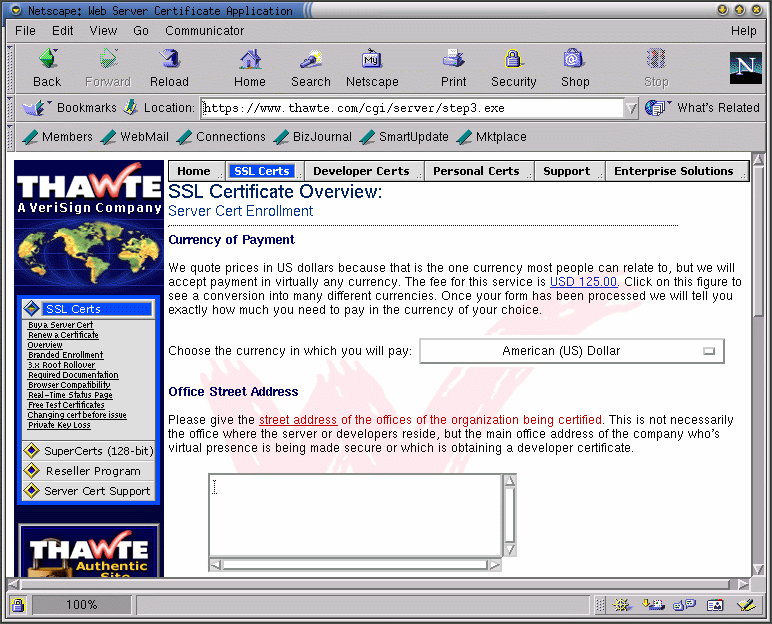
The next page, also entitled Server Cert Enrollment, is the last page of their enrollment form and is shown as Figure 11-5. From the first pull-down menu, choose the currency in which you are going to pay Thawte.
Type the street address for your organization into the Office Street Address text box.
Type in your organization's fax number into the text box under Office Fax Number.
From the pull-down menu under Nearest Thawte Office, choose the Thawte office closest to your organization.
Type a password or challenge phrase into the text box under Privacy Protection Password. After you've submitted your application, you'll be able to check on its status on the Web.
Click on Next at the bottom of the page.
The next page will indicate that your submission is complete. This page provides you with a tracking number for your application, so that you can monitor its status over the Web.
After Thawte receives your documentation and payment, your certificate should be issued by e-mail. When you receive your certificate, save it into the /etc/httpd/conf/ssl.crt/server.crt file. See the section called Testing Your Certificate, for instructions on installing your certificate.