Installing New Packages
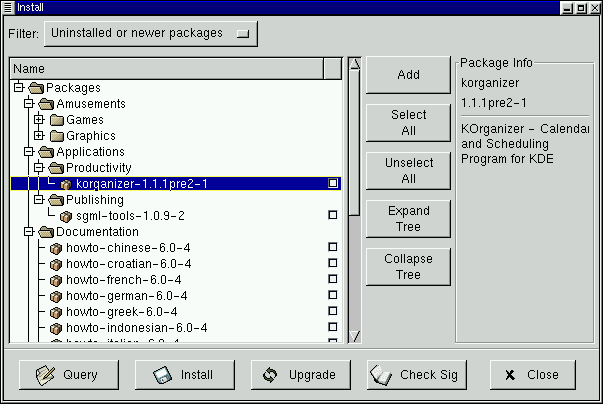
To install new packages, choose Install from the toolbar. The Install window will open, revealing packages which are either already installed, newer packages or other options, which can be selected from the Filter drop-down bar at the top of the window. See Figure 6-4 for an example of the Install window, using the filter for "All but installed packages."
Using the Filter feature allows you to winnow your choices for viewing packages. Available filters for viewing include:
All packages
All but installed packages
Only uninstalled packages
Only newer packages
Uninstalled or newer packages
You can switch the display of packages by using the drop-down bar at the top of the window.
Choose the Add button. By default, if your CD-ROM is mounted with a Red Hat Linux CD-ROM, Gnome-RPM will search in /mnt/cdrom/RedHat/RPMS for new packages. (You can find this default option in the Install Window tab of the Preferences dialog. See the section called Configuration for more information on this feature.)
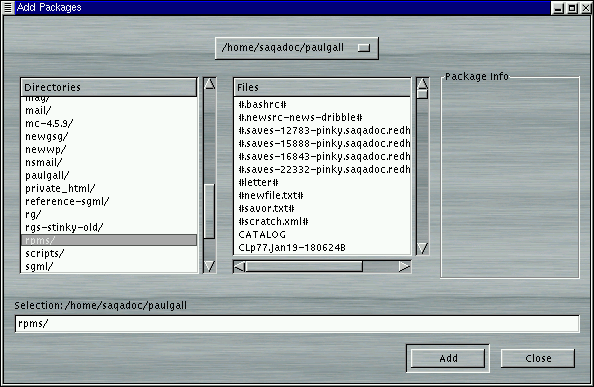
If no packages are available in the default path, you'll be presented with an Add Packages window from which you can select the appropriate location of your new package. In this view, you can select the correct path by using the drop-down bar at the top of the window to quickly navigate to pre-set locations; or you can double-click in the left panel of the Add Packages window to navigate to the correct path (as in Figure 6-4). You can also type the path in the text window at the bottom of the Add Packages window.
 | Please Note |
|---|---|
If you download RPMs, you'll likely find those downloaded packages in a directory called rpms within your home directory. For example, if your home directory is /home/bill, your downloaded RPMs will be in /home/bill/rpms. |
By clicking on the item, you'll find a brief description of the package in the Package Info panel of the Install window. To perform an installation or a query on the package, click inside the checkbox next to the package, then select the Install button. You can also query the item once it's checked; from within the Package Info window, you can also perform the installation (see Figure 6-10 in the section called Querying Packages for an example).
To choose an item, double-click on it with your left mouse button, or click on the Add button. The selected package(s) will be added to the Install window. You can also install more than one package in the same manner; each selection will be added to the Install window.
In addition to choosing to install the packages from within the Install window, you can install after performing a query on the selected package. Click on Query, which will open the Package Info window. Here, you can find a variety of details about the file(s) you've selected to install. Information will include the origination of the package, the date it was built, its size and more.
Within this Package Info window, you have the option of installing or upgrading packages.
If the package already exists on your system and you're querying a newer release, the Package Info window provides an Upgrade button, which will perform an upgrade to newer releases.
You can also "drag and drop" packages from GNOME File Manager. Within the File Manager, left-click on your selected RPM file then, while still holding down the mouse button, "drag" the file to the Install window and place it within the Name panel.
When dragging files to the Install window from the File Manager, you'll notice that the file appears as an icon while it's being dragged toward Gnome-RPM. Once inside the Name panel, you'll see that the package is checked for installation by default, and its information appears in the Package Info panel to the right.
To install the package now, just select the Install button.
You'll see a progress indicator when your package is being installed.

