Appendix E. RAID (Redundant Array of Independent Disks)
What is RAID?
The basic idea behind RAID is to combine multiple small, inexpensive disk drives into an array which yields performance exceeding that of one large and expensive drive. This array of drives will appear to the computer as a single logical storage unit or drive.
RAID is a method in which information is spread across several disks, using techniques such as disk striping (RAID Level 0) and disk mirroring (RAID level 1) to achieve redundancy, lower latency and/or higher bandwidth for reading and/or writing to disks, and maximize recoverability from hard-disk crashes.
The underlying concept in RAID is that data may be distributed across each drive in the array in a consistent manner. To do this, the data much first be broken into consistently-sized "chunks" (often 32K or 64K in size, although different sizes can be used). Each chunk is then written to each drive in turn. When the data is to be read, the process is reversed, giving the illusion that multiple drives are actually one large drive.
Who Should Use RAID?
Those of you who need to keep large quantities of data on hand (such as an average administrator) would benefit by using RAID technology. Primary reasons to use RAID include:
enhanced speed
increased storage capacity (and more economical)
greater efficiency in recovering from a disk failure
RAID: Hardware vs. Software
There are two possible approaches to RAID: Hardware RAID and Software RAID.
Hardware RAID
The hardware-based system manages the RAID subsystem independently from the host and presents to the host only a single disk per RAID array.
An example of a hardware RAID device would be one that connects to a SCSI controller and presents the RAID arrays as a single SCSI drive. An external RAID system moves all RAID handling "intelligence" into a controller located in the external disk subsystem. The whole subsystem is connected to the host via a normal SCSI controller and appears to the host as a single disk.
RAID controllers also come in the form of cards that act like a SCSI controller to the operating system, but handle all of the actual drive communications themselves. In these cases, you plug the drives into the RAID controller just like you would a SCSI controller, but then you add them to the RAID controller's configuration, and the operating system never knows the difference.
Software RAID
Software RAID implements the various RAID levels in the kernel disk (block device) code. It also offers the cheapest possible solution: Expensive disk controller cards or hot-swap chassis [1] are not required, and software RAID works with cheaper IDE disks as well as SCSI disks. With today's fast CPUs, software RAID performance can excel against hardware RAID.
The MD driver in the Linux kernel is an example of a RAID solution that is completely hardware independent. The performance of a software-based array is dependent on the server CPU performance and load.
Some Features of RAID
For those interested in learning more about what software RAID has to offer, here is a brief list of few of those features:
Threaded rebuild process
Fully kernel-based configuration
Portability of arrays between Linux machines without reconstruction
Backgrounded array reconstruction using idle system resources
Hot-swappable drive support
Automatic CPU detection to take advantage of certain CPU optimizations
Levels and linear support
RAID also offers levels 0, 1, 4, 5, and linear support. These RAID types act as follows:
Level 0 -- RAID level 0, often called "striping," is a performance- oriented striped data mapping technique. That means the data being written to the array is broken down into strips and written across the member disks of the array. This allows high I/O performance at low inherent cost but provides no redundancy. Storage capacity of the array is equal to the total capacity of the member disks.
Level 1 -- RAID level 1, or "mirroring," has been used longer than any other form of RAID. Level 1 provides redundancy by writing identical data to each member disk of the array, leaving a "mirrored" copy on each disk. Mirroring remains popular due to its simplicity and high level of data availability. Level 1 operates with two or more disks that may use parallel access for high data-transfer rates when reading, but more commonly operate independently to provide high I/O transaction rates. Level 1 provides very good data reliability and improves performance for read-intensive applications but at a relatively high cost[2]. Array capacity is equal to the capacity of one member disk if you use identical disk drives.
Level 4 -- Level 4 uses parity[3] concentrated on a single disk drive to protect data. It's better suited to transaction I/O rather than large file transfers. Because the dedicated parity disk represents an inherent bottleneck, level 4 is seldom used without accompanying technologies such as write-back caching. Although RAID level 4 is an option in some RAID partitioning schemes, it is not an option allowed in Red Hat Linux RAID installations[4]. Array capacity is equal to the capacity of member disks, minus capacity of one member disk if you use identical disk drives.
Level 5 -- The most common type of RAID. By distributing parity across some or all of an array's member disk drives, RAID level 5 eliminates the write bottleneck inherent in level 4. The only bottleneck is the parity calculation process. With modern CPUs and software RAID, that isn't a very big bottleneck. As with level 4, the result is asymmetrical performance, with reads substantially outperforming writes. Level 5 is often used with write-back caching to reduce the asymmetry. Array capacity is equal to the capacity of member disks, minus capacity of one member disk if you use identical disk drives.
Linear RAID -- Linear RAID is a simple grouping of drives to create a larger virtual drive. In linear RAID, the chunks are allocated sequentially from one member drive, going to the next drive only when the first is completely filled. This grouping provides no performance benefit, as it is unlikely that any I/O operations will be split between member drives. Linear RAID also offers no redundancy, and in fact decreases reliability -- if any one member drive fails, the entire array cannot be used. The capacity is total of all member disks.
Creating RAID Partitions
RAID is available in both the GUI and kickstart installation modes. You can use fdisk or Disk Druid to create your RAID configuration, but these instructions will focus mainly on using Disk Druid to complete this task.
Before you can create a RAID device, you must first create RAID partitions, using the following step-by-step instructions.
 | Tip: If You Use fdisk |
|---|---|
If you are using fdisk to create a RAID partition, bear in mind that instead of creating a partition as type 83, which is Linux native, you must create the partition as type fd (Linux RAID) and that partitions within a given RAID array should span identical cylinders on drives for best performance. |
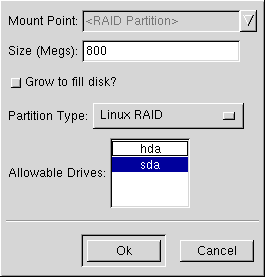
Create a partition. In Disk Druid, choose Add to create a new partition (see Figure E-1).
You will not be able to enter a mount point (you will be able to do that once you've created your RAID device).
Enter the size that you want the partition to be.
Select Grow to fill disk if you want the partition to grow to fill all available space on the hard disk. In this case, the partition's size will expand and contract as other partitions are modified. If you make more than one partition grow-able, the partitions will compete for the available free space on the disk.
Enter the partition type as RAID.
Finally, for Allowable Drives, select the drive that RAID will be created on. If you have multiple drives, all drives will be selected here and you must deselect those drives which will not have RAID array on it.
Continue these steps to create as many partitions as needed for your RAID setup.
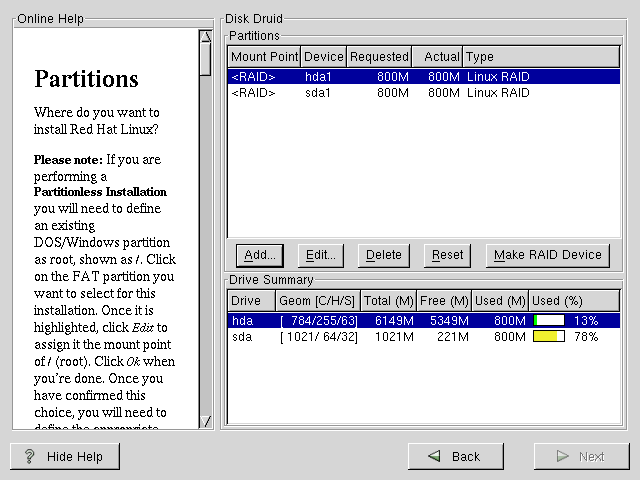
Once you have all of your partitions created as RAID partitions, select the Make RAID Device button on the Disk Druid main partitioning screen (see Figure E-2).
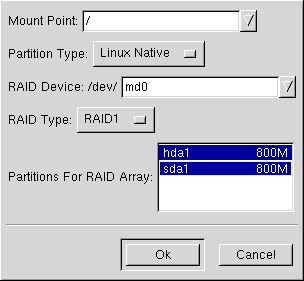
Next, Figure E-3 will appear which will allow you to make a RAID device.
First, enter a mount point.
Next, make sure the partition type is set as Linux Native (which will be the default).
Choose your RAID device. You should choose md0 for your first device, md1 for your second device, and so on, unless you have a specific reason to make it something else. Raid devices range from md0 to md7, and each may only be used once.
Choose your RAID type. You can choose from RAID 0, RAID 1, and RAID 5.

Please Note If you are making a RAID partition of /boot, you must choose RAID level 1 and it must use one of the first two drives (IDE first, SCSI second). If you are not creating a RAID partition of /boot, and are making a RAID partition of /, it must be RAID level 1 and it must use one of the first two drives (IDE first, SCSI second).
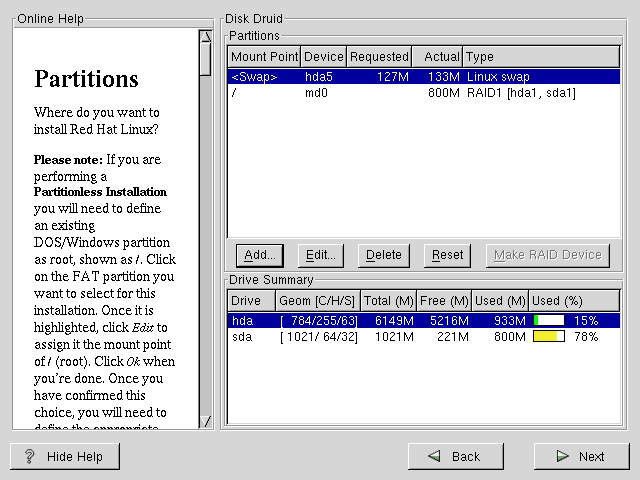
Finally, select which partitions will go into this RAID array (as in Figure E-4) and then click Next.
From here, you can continue with your installation process. Refer back to the Official Red Hat Linux Installation Guide for further instructions.


