Chapter 14. Installing Red Hat Linux via Text Mode
This release of Red Hat Linux features a graphical, mouse-based installation program, documented in the Official Red Hat Linux Installation Guide. But you can also install Red Hat Linux with a text mode, keyboard-based installation program. This chapter explains how to use it. Here are some recommendations:
If you're new to Linux installations, read the Official Red Hat Linux Installation Guide first. Although it focuses on the graphical installation process, most of the concepts apply to the text mode installation as well. After that, you'll find that Chapter 13, Preparing for a Text Mode Installation, will give you more in-depth information regarding those aspects of installing Red Hat Linux that do not apply to the graphical installation process.
Additionally, you'll find Appendix B, An Introduction to Disk Partitions, helpful, as it discusses disk partition resizing (crucial if you plan to install Linux on a disk where another operating system is currently installed).
If you'll need PCMCIA support to perform the installation (for example, you're installing on a laptop equipped with a PCMCIA card), you must make a PCMCIA boot disk. The Official Red Hat Linux Installation Guide explains how to do this.
If you plan to install over a network (via NFS, FTP, or HTTP), you must make a network boot disk. The Official Red Hat Linux Installation Guide explains how to do this.
If you've never used the text mode installation program, or need a refresher on its user interface, read the next section.
To begin installation without further delay, turn to the section called Starting the Installation Program.
The Installation Program User Interface
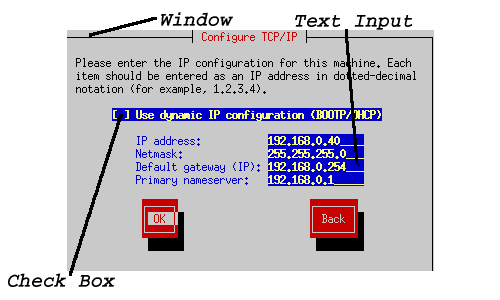
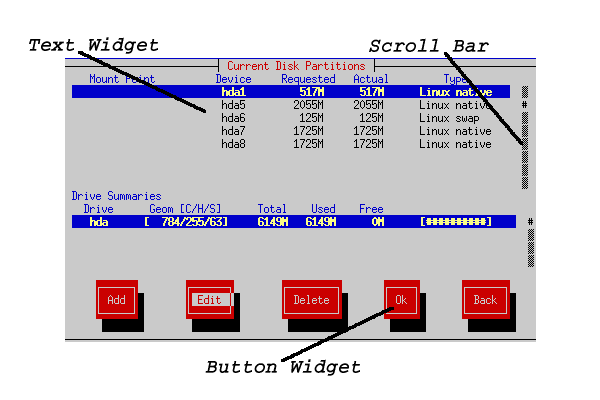
The Red Hat Linux text mode installation program uses a screen-based interface that includes most of the on-screen "widgets" commonly found on graphical user interfaces. Figure 14-1 and Figure 14-2 illustrate the screens you'll see.
Here's a list of the most important widgets shown in Figure 14-1 and Figure 14-2:
Window -- Windows (usually referred to as dialogs in this manual) will appear on your screen throughout the installation process. At times, one window may overlay another; in these cases, you can only interact with the window on top. When you are finished in that window, it will disappear, allowing you to continue working in the window underneath.
Text Input -- Text input lines are regions where you can enter information required by the installation program. When the cursor rests on a text input line, you may enter and/or edit information on that line.
Check Box -- Check boxes allow you to select or deselect a feature. The box displays either an asterisk (selected) or a space (unselected). When the cursor is within a check box, press Space to select an unselected feature or to deselect a selected feature.
Text Widget -- Text widgets are regions of the screen for the display of text. At times, text widgets may also contain other widgets, such as check boxes. If a text widget contains more information than can be displayed in the space reserved for it, a scroll bar appears; if you position the cursor within the text widget, you can then use the Up and Down arrow keys to scroll through all the information available. Your current position is shown on the scroll bar by a # character, which moves up and down the scroll bar as you scroll.
Button Widget -- Button widgets are the primary method of interacting with the installation program. You progress through the windows of the installation program by navigating these buttons, using the Tab and Enter keys. Buttons can be selected when they are highlighted.
Cursor -- Although not a widget, the cursor is used to select (and interact) with a particular widget. As the cursor is moved from widget to widget, it may cause the widget to change color, or you may only see the cursor itself positioned in or next to the widget. In Figure 14-1, the cursor is positioned on the OK button. Figure 14-2 shows the cursor on the Edit button.
Using the Keyboard to Navigate
Navigation through the installation dialogs is performed through a simple set of keystrokes. To move the cursor, use Left, Right, Up, and Down arrow keys. Use Tab, and Alt-Tab to cycle forward or backward through each widget on the screen. Most screens display along the bottom a summary of available cursor positioning keys.
To "press" a button, position the cursor over the button (using Tab, for instance) and press Space or Enter. To select an item from a list of items, move the cursor to the item you wish to select and press Enter. To select an item with a check box, move the cursor to the check box and press Space to select an item. To deselect, press Space a second time.
Pressing F12 accepts the current values and proceeds to the next dialog; it is equivalent to pressing the OK button.
 | Caution |
|---|---|
Unless a dialog box is waiting for your input, do not press any keys during the installation process (doing so may result in unpredictable behavior). |

