Chapter 5. Installing Red Hat Linux From Start to Finish
This chapter discusses all steps of a Red Hat Linux workstation-class installation. We'll cover the following areas:
Getting familiar with the installation program's user interface
Starting the installation program
Selecting an installation method
Configuration steps during the installation (language, keyboard, mouse, etc.)
Finishing the installation
By the end of this chapter, you will have Red Hat Linux 7.0 installed on your system.
The Installation Program User Interface
If you've used a graphical user interface (GUI) before, you'll be familiar with this process. If not, simply use your mouse to navigate the screens, "click" buttons or enter text fields. You can also navigate through the installation using the Tab and Enter keys.
If you do not wish to use the GUI installation program, the text mode installation program is also available. To enter text mode, enter the following boot command:
boot: text |
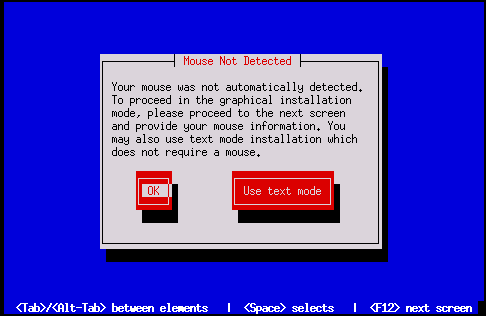
Mouse Not Detected?
If the Mouse Not Detected screen (see Figure 5-1) appears, then the installation program was not able to identify your mouse correctly.
You can choose to continue with the GUI installation or use the text mode installation, which does not require using a mouse. If you choose to continue with the GUI installation, you will need to provide the installation program with your mouse configuration information (see Figure 5-4).
For text mode workstation-class installation instructions, please refer to Chapter 6.
For text mode custom installation instructions, please refer to the Official Red Hat Linux Reference Guide on the Documentation CD.
A Note About Virtual Consoles
The Red Hat Linux installation program offers more than the dialog boxes of the installation process. Several types of diagnostic messages are available to you, and you're additionally provided a way to enter commands from a shell prompt. This information is presented on five virtual consoles, among which you can switch using a single keystroke.
These virtual consoles can be helpful if you encounter a problem while installing Red Hat Linux. Messages displayed on the installation or system consoles can help pinpoint a problem. Please see Table 5-1 for a listing of the virtual consoles, keystrokes to switch to them, and their contents.
Generally, there's no reason to leave the default console (virtual console #7) unless you are attempting to diagnose installation problems. But if you get curious, feel free to look around.