Configuring X
Q: Changing Screen Resolution
Everything on my desktop looks tiny. How do I change my screen resolution?
A. Use Xconfigurator
After you have installed Red Hat Linux, you may wish to change your screen resolution, so that objects will fit better on your desktop. You can adjust the resolution with Xconfigurator, a tool which allows you to modify your X Window System settings.
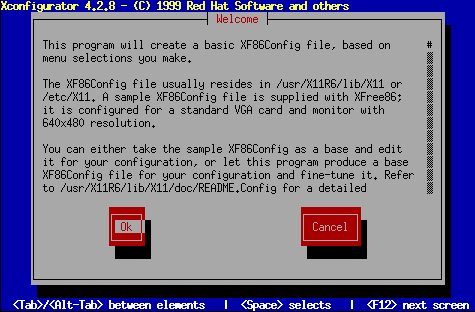
To use Xconfigurator, you must log in as root. At a shell prompt, type Xconfigurator to start the application. The opening screen will look like Figure 17-3.
 | Other ways to start the utility |
|---|---|
You can also start Xconfigurator two other ways -- both of which give you access to additional configuration tools. You must log in as root, remember. From your application menu, such as the main menu button in GNOME, go to System => Text mode tool menu; or, from a shell prompt, type setup. Both methods will produce a menu of items which you can configure, such as X, your sound card, mouse and other features. |
To navigate and make selections, use your Tab key. When your selection is highlighted, press the Enter key.
 | Is your hardware supported? |
|---|---|
Make certain that your monitor and graphics card are supported for Red Hat Linux. To check, visit the Hardware Compatibility List at http://www.redhat.com/hardware. |
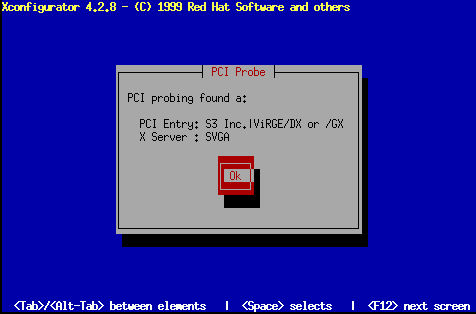
To continue, tab until the Ok button is highlighted and press Enter. Xconfigurator will then probe your system for your video card, and suggest the correct X server to match your system, as in Figure 17-4. Click the Ok button to proceed.
Next, pick your exact monitor make and model number, as in Figure 17-5. (Hint: You can often find the make and model number on the front or back of your monitor.)
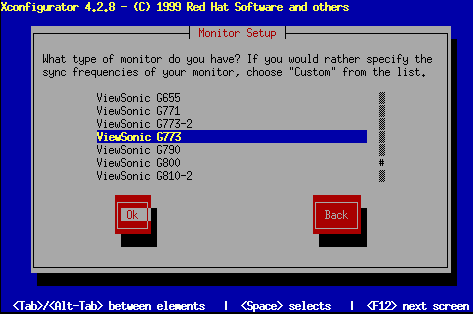
You'll have quite a few monitor choices -- the hash mark (#) indicates your position in the list. Use your up-arrow and down-arrow keys to move through the list, or use the Home, End, Page Up and Page Down keys. You can also jump to the manufacturer's place on the list by typing in the first letters of the name (such as ViewSonic) on your keyboard.
| Monitor not on the list? |
|---|---|
If you don't find your monitor among the listed makes and models, you can specify your monitor's horizonal and vertical sync frequencies by choosing Custom in the list. Refer to your monitor's documentation for information about its correct frequency rates. Be careful! Don't select a frequency range which exceeds your monitor's capacity, because you could damage or destroy it. |
Once you have selected your monitor's make and model, a dialog will inform you that your card will be probed for its correct display settings. Don't worry if your monitor blinks during the process; it's normal.
| If you don't want to probe |
|---|---|
It isn't necessary to probe your video card. If you choose the Don't Probe option, the next dialog will ask you how much memory is on your video card, then you will be able to select your chosen resolution (see Figure 17-7). |
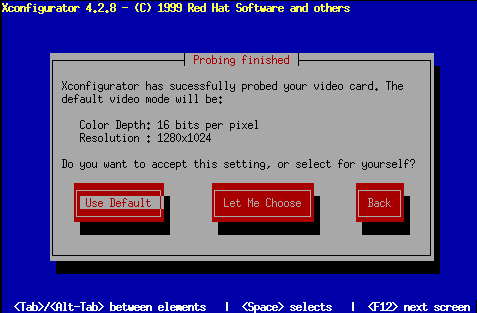
Once the probing has finished, you'll find a dialog similar to Figure 17-6. If you want to accept the default settings, select Use Default. If you'd prefer different settings, select the Let Me Choose button.
If you want to choose video resolutions different than the default, you will be presented with the Select Video Modes dialog, such as Figure 17-7.
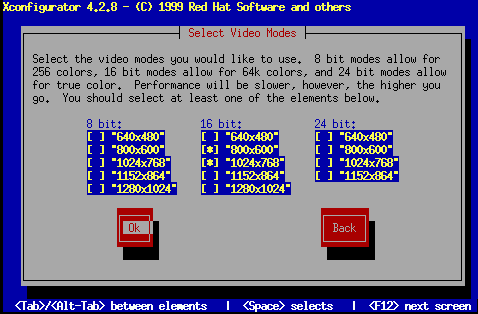
You can choose modes ranging from 8-bit to 24-bit, depending on the power of your computer and how many colors you want displayed. In each of the mode columns, you'll find resolution choices listed; using your Tab key, position the cursor in the boxes next to your chosen resolution and select by pressing Space.
| Choosing more than one resolution? |
|---|---|
You can select more than one screen resolution -- for example, if you prefer 800x600 and 1024x768, you can adjust your resolution "on the fly." To do this, use the Ctrl-Alt-+ (plus) or Ctrl-Alt-- (minus) keys. |
When you're finished making your selections, press Ok.
Next, your video settings will be tested. You will see a graphical screen, with a dialog asking whether your settings appear correct. Following this dialog, another will ask whether you want a graphical login screen; if you answer Yes, you will have a graphical screen when you log in to your system. A final dialog will inform you of the location of your video configuration file (XF86Config, which is in /etc/X11).
If everthing seems fine, log out, then log in again to your new screen resolution.