Chapter 10. File Managers in GNOME and KDE
In both GNOME and KDE, the file managers are true workhorses. Use these powerful applications to help you create, edit, and delete files and directories, as well as accomplish other tasks throughout your system.
Both file managers support drag and drop, and provide you with a fast and easy way to "see" your system. Either file manager will open in your login directory by default. To view other directories on your system, click on the "file folder" representing the directory in the tree view pane on the left of the file manager. The contents of the folder will appear in the directory window, the pane on the right.
 | Do you have permission? |
|---|---|
Unless you're root, you won't be able to gain access to all the files and directories on your system. If you don't have the permission to open, delete or execute a file, you'll receive an error message that your access is denied. |
This chapter will provide an overview of GMC and KFM, the file managers for GNOME and KDE. To learn more details about using them, read the GNOME User's Guide or the KDE user's documentation in their respective help browsers. You'll also be able to find the latest documentation at their websites: http://www.gnome.org and http://www.kde.org.
The GNOME File Manager
Fast, friendly and flexible, the GNOME File Manager lets you easily browse and work with files and directories. The proper name for the file manager is GNU Midnight Commander, or GMC, because it's based on the Midnight Commander file manager.
 | You can still use Midnight Commander |
|---|---|
If you want to use Midnight Commander, you can start it in an Xterm by typing mc at the prompt. |
Using the File Manager
There are two ways to easily start GMC:
From the Main Menu Button -- Click on File Manager entry.
From the desktop -- Double-click on the file folder labeled Home directory, which looks like:

When you first open the GMC, you'll see something similar to Figure 10-1.
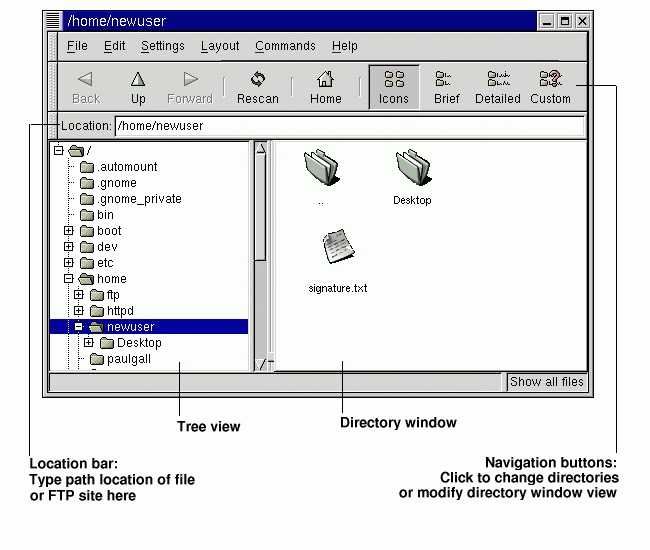
As a new user, it's unlikely you'll find many new files or directories when you first open the file manager. That's because by default, GMC opens in your login directory. Note the file signature.txt, however, in Figure 10-1. This is the signature file the user newuser created while configuring Netscape Messenger.
The tree view, to the left, will reveal all of the directories on your system. Single-click on a folder to reveal its contents in the directory window, at right. Folders which have a + next to them indicate that they hold subdirectories and the view is collapsed; click on the + to expand the view and reveal the subdirectories.
Use the following buttons on the menu above the Location bar to determine the detail of view you want:
Icons -- The default view. Displays icons to represent each file and directory type.
Brief -- Shows directories and files in a list, with directories at the top.
Detailed -- Shows a list, along with details such as the size and modification time of the files.
Custom -- Shows a customized detailed list (you can select items you want to include from the Settings menu, in Preferences => Custom View).
| Change the order |
|---|---|
If you view directory contents in one of the list choices, you can arrange your view of the list by clicking on one of the list headings. For example, if you want to see the contents alphabetically, click on the Name heading. |
Navigation
Like many file managers, you can move around by using the scrollbar next to the tree view to locate a directory you want to move to.
You can also use the navigation buttons above the Location bar similar to the way you would use the navigation buttons in Netscape Navigator:
Back and Forward -- Move you up or down through the directory listing history
Up -- Moves you "up" the directory tree
Rescan -- Refreshes the view of the current directory
Home -- Lets you jump back to your default directory
The Location bar allows you to type the directory location. If you know the path where you want to go, for example /etc/X11, you can type it into the Location bar and press Enter to jump to that location.
Actually, the Location bar can let you browse more than just your local system. If you're online, and you type in the location of an FTP site, such as ftp.redhat.com, you'll be able to see the files on that site which are available for download. The FTP command should look like this: ftp://ftp.redhat.com. To download, just copy a file to a directory on your local machine.
| GMC plays well with Gnome-RPM |
|---|---|
Speaking of downloaded files, you can use GMC to perform RPM-related work on new software packages, such as those you download or find on a CD. Just right-click on the package, and GMC offers you options to install, verify, query, and more (remember, you must be root to install or uninstall software). You can also drag and drop packages from the file manager into Gnome-RPM for installation (refer to the section called Installing New Packages in Chapter 12 for more on this). To learn more about Gnome-RPM and RPM, turn to Chapter 12. |
Copying and Moving Files
You can copy and move files from the directory window to your desktop or to another folder (that is, directory). If you want to move a file to your desktop, just "pick it up" by clicking on it once and holding down the mouse button. Release the file on the desktop; by default, this action causes the file to be moved to your desktop.
If you'd prefer to copy the file rather than move it, click on the file, then drag it while holding down the Shift key.
| Choose when you get there |
|---|---|
Not sure whether you want to move or copy a file? Use the Alt key when you drag a file. A pop-up menu will appear once you release the file, letting you choose whether to copy or move the file. You can also choose to link the file, which essentially is a shortcut to the file in its original location. |
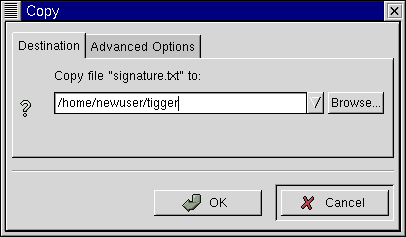
If you know the path to the directory to which you want to copy a file, you can right-click on the file and choose Copy from the menu of options which opens. A dialog will open, in which you can type the location where you want to copy the file (as in Figure 10-2).
In the Advanced Options tab of the Copy dialog, you can choose to Preserve symlinks, which will make certain that if the file you're copying is a symbolic link, or shortcut, it will be the same shortcut after it's copied. Rather than risk losing a shortcut, you should make certain you select this option if you're copying -- or moving -- a file that is a shortcut to another file.
| Moving works the same way |
|---|---|
Just as you can copy a file by right-clicking, so too, you can move a file by right-clicking on it and selecting Move from the menu which appears. If you want to rename the file while moving or copying it, type its new name in the Copy or Move box which opens. For example, if you want to copy the file signature.txt to /home/newuser/tigger and rename it backup.txt, you would type /home/newuser/tigger/backup.txt. |
File Properties
To change a file's properties, right-click on a file or directory in the directory window and choose Properties. A dialog, similar to Figure 10-3, will open.
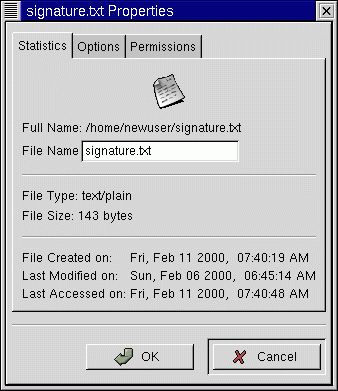
In the Statistics tab, you'll find information about the file, such as the date and time it was created and modified.
In the File Name field, you can change the name of the file.
In the Options tab, you can change action options for the file, such as how the file will be opened, viewed and edited. You probably won't have a reason to worry about these items; they already have default settings.
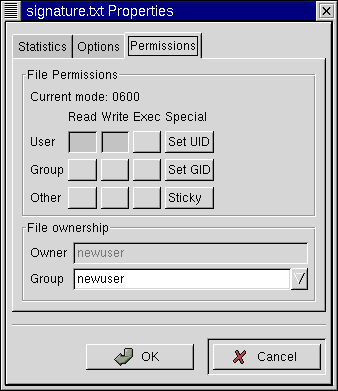
In the Permissions tab (see Figure 10-4), you can change the permissions and ownership of a file (that is, if you have the permission yourself). You can change the read, write and execute settings, as well set UID, GID and Sticky bits.
| UID, GID and Sticky bits? |
|---|---|
Essentially, these items refer to user management and permissions. UID means User ID, a unique number given to every user on the system; GID means Group ID, the ID of the user's default group. Sticky refers to Sticky bit. You probably won't have to worry about setting the Sticky bit. For more about how to work with permissions, see the section called Ownership and Permissions in Chapter 15. Once you understand the idea behind file permissions, you may find using the Permissions tab a convenient way to change a file or directory's permission settings. |
Setting GMC's Preferences
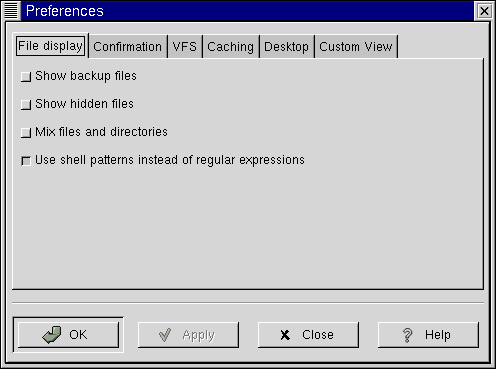
You can adjust quite a few settings for GMC in the Preferences dialog (Settings => Preferences); see Figure 10-5 for an example of the Preferences dialog.
The dialog includes the following tabbed sections:
File display -- Modify the way files are viewed. Select Show backup files to reveal backup files; Show hidden files to show dot files, usually configuration files and directories; Mix files and directories allows you to see files and directories in an order you select in the directory window; you don't really have to concern yourself with the Use shell patterns... choice, because it concerns sorting with regular expressions, which is probably more useful to advanced users.
Confirmation -- Select whether you should be required to confirm any decision to delete, overwrite and execute files. You can also choose whether you want to see a progress indicator while the actions are being executed.
VFS -- VFS means Virtual File System. VFS means that you can work with files which aren't on your local machine. Information in this tab applies to actions related to FTP sites. VFS Timeout refers to the time (in seconds) you can be connected without activity, before you're disconnected. The entry in Anonymous FTP password refers to the identification you want to be transferred for anonymous logins at FTP sites. (Typically, this is your e-mail address.) Enable the option to Always use FTP proxy if you're required to use a proxy to connect to FTP sites.
Caching -- These settings may help to increase the speed of GMC. Select Fast directory reload to store directory information in memory to speed the load time. Using this option may not always result in an updated display, however. Compute totals before copying files will cause GMC to calculate the number of files you're copying so it can provide information to you about the task. FTP directory cache timeout is the length of time (in seconds) to hold information about an FTP site in memory. Allow customization of icons in icon view lets you change the icon style in the directory window. Note that checking this may decrease performance.
Desktop -- Here, you can specify some ways that you view the items on your desktop. Click inside the Icon position box to specify how the icons should be aligned on your desktop. Select Automatic icon placement to arrange icons on your desktop automatically, rather than arranging them manually. Click Snap icons to grid if you want icons on the desktop to be aligned. Use shaped icons and Use shaped text allow the icons and related text labels to be semi-transparent on your desktop, rather than "blocky" icons and labels.
Custom View -- In this dialog, you can specify the additional information you want to see when you select the Custom button from GMC's menu.