Chapter 13. Getting Started with GnuPG
Introducing GnuPG
Have you ever wondered if your e-mail is really safe from snoops? It's easy enough to assume that your intended recipient will read your message, but unfortunately, it's also conceivable that complete strangers could intercept or even tamper with your e-mail.
In traditional "snail mail," letters are usually sealed within envelopes, stamped and delivered from post office branch to branch until they reach their destination. But sending mail through the Internet is much less secure; e-mail is usually transmitted as clear text from server to server. No special steps are taken to protect your correspondence from prying eyes or malicious behavior.
To help you protect your privacy, Red Hat Linux 6.2 includes GnuPG, the GNU Privacy Guard, which is installed by default during a typical Red Hat Linux installation.
GnuPG is a tool for secure communication; it is a complete and free replacement for the encryption technology of PGP (Pretty Good Privacy, a widely popular encryption application). With GnuPG, you can encrypt your data and correspondence, and authenticate your correspondence by digitally signing your work. GnuPG is also capable of decrypting and verifying PGP 5.x.
Because GnuPG is compatible with other encryption standards, your secure correspondence will probably be compatible with e-mail applications on other platforms, such as Windows and MacOS.
GnuPG uses public key cryptography to provide users with a secure exchange of data. In a public key cryptography scheme, you generate two keys: a public key and a private key. You exchange your public key with correspondents or with a keyserver; you should never reveal your private key.
Encryption depends upon the use of keys (think of them as secret encoder/decoder rings in data format). In conventional or symmetric cryptography, both ends of the transaction have the same key, which they use to decode each other's transmissions. In pubic key cryptography, two keys co-exist: a public key and a private key. A person or an organization keeps their private key a secret, and publishes their public key. Data encoded with the public key can only be decoded with the private key; data encoded with the private key can only be decoded with the public key.
 | More information from the shell prompt |
|---|---|
Like most system tools for Red Hat Linux, you'll find documentation on GPG in the man pages and info pages. At a shell prompt, just type man gpg or info gpg for a quick reference of GPG commands and options. |
For the most part, cryptography is beyond the scope of this publication; volumes have been written about the subject. In this chapter, however, we hope you'll gain enough understanding about GnuPG to begin using cryptography in your own correspondence. For more information about GnuPG, including an online users guide, visit http://www.gnupg.org/. If you want to learn more about GPG, PGP and encryption technology, turn to the references in the section called Where to find more information.
There are several graphical interfaces for GnuPG, such as SeaHorse, which is included with Red Hat Linux 7.0. However, many tasks in GnuPG can be performed quickly from the shell prompt. That's what we'll concentrate on in this chapter.
Generating a Keypair
To begin using GnuPG, you must first generate a new keypair -- that is, a public and a private key.
While instructions for generating a keypair have been previously covered (see the section called Generating a new keypair in Chapter 12), here's a quick summary of the steps involved.
To generate a keypair, open an Xterm (or, terminal) window and, at the prompt, type
gpg --gen-key |
You'll be asked to select from a number of options, such as the kind of key you want to create and the size of the key. Default options will also be available, which you can choose by simply pressing the Enter key. Unless you have a reason for choosing otherwise, you'll be fine selecting the default choices.
Enter a user ID, with your name, e-mail address and an optional comment. Then, enter a passphrase which, like your account passwords, must be unique and secure enough to insure that no one will be able to guess it. A passphrase can be either a single word or a phrase you'll type at the prompt which identifies you as the owner of the keypair. Of course, whatever you choose, make certain that you can remember it!
 | A soft spot |
|---|---|
Public key cryptography is strong, but not bulletproof. One of the weakest aspects of this technology is the vulnerability of passphrases or passwords. Picking a passphrase such as your birthdate or your significant other's address is not a good idea. Try to pick something out of the ordinary, with a mix of letters and numbers. For your passphrase, you should be as cautious as you would be with your login password. |
After your public and private keys are created, they'll be placed in the .gnupg directory. To list your keys, type gpg --list-keys. You'll see your new key, similar to the following:
[newuser@localhost newuser]$ gpg --list-keys /home/newuser/.gnupg/pubring.gpg ----------------------------------------- pub 1024D/B7085C8A 2000-04-18 Your Name <you@yourisp.net> sub 1024g/E12AF9C4 2000-04-18 |
Generating a Revocation Certificate
Once you have created your keypair, you should create a revocation certificate for your public key. If you should forget your passphrase, or if it's been discovered, you can publish this certificate to inform users that this public key should not be used.
 | Why "revoke" a key you just created? |
|---|---|
When you generate a revocation certificate, you're not revoking the key you just created. Instead, you're giving yourself a safe way to revoke your key from public use. Let's say you create a key, then you forget your passphrase, switch ISPs (addresses), or suffer a hard drive crash. Suddenly, that revocation certificate can be a handy way to disqualify your public key. |
Your signature will be valid to others who read your correspondence before your key is revoked, and you will be able to decrypt messages received prior to its revocation. To generate a revocation certificate, use the --gen-revoke option.
[newuser@localhost newuser]$ gpg --output revoke.asc --gen-revoke <you@yourisp.net> |
Note that if you omit the --output revoke.asc option from the above, your revocation certificate will be returned to the "standard output," which is your monitor screen. While you can copy and paste the contents of the output into a file of your choice using a text editor, such as Pico, it's probably easier to send the output to a file in your login directory. That way, you can keep the certificate handy for use later, or move it to a floppy disk and store it someplace safe.
The transaction for creating a revocation certificate will look like the following:
[newuser@localhost newuser]$ gpg --output revoke.asc --gen-revoke  <you@yourisp.net>

sec  1024D/823D25A9 2000-04-26  Your Name <you@yourisp.net>

Create a revocation certificate for this key? y

You need a passphrase to unlock the secret key for
user: "Your Name <you@yourisp.net>"
1024-bit DSA key, ID 823D25A9, created 2000-04-26

ASCII armored output forced.
Revocation certificate created.
|
Once your revocation certificate has been created (revoke.asc), it will be located in your login directory. You should make sure the file is safe, so your best bet is to copy it to a floppy diskette and store it in a secure place. (If you don't know how to copy a file to a diskette in Red Hat Linux, see the section called Using a Diskette in Chapter 17.)
Exporting your Public Key
Before you can use public key cryptography, others must actually have a copy of your public key. To send your key either to correspondents, or to a keyserver, you must export the key.
To export your key, so you can display it on a Web page or paste it in e-mail, type the following:
[newuser@localhost newuser]$ gpg --armor --export <you@yourisp.net> > mykey.asc [newuser@localhost newuser]$ |
You won't see anything, because not only did you export your public key, you redirected the output to a file called, for example, mykey.asc. (Without the addition of > mykey.asc, the key would have been displayed as the standard output -- on the monitor screen.)
Now, the file mykey.asc can be inserted into e-mail or exported to a keyserver. To see the key, type less mykey.asc to open the file in a pager (type Q to quit the pager). It should look like the following:
-----BEGIN PGP PUBLIC KEY BLOCK----- Version: GnuPG v1.0.1 (GNU/Linux) Comment: For info see http://www.gnupg.org mQGiBDkHP3URBACkWGsYh43pkXU9wj/X1G67K8/DSrl85r7dNtHNfLL/ewil10k2 q8saWJn26QZPsDVqdUJMOdHfJ6kQTAt9NzQbgcVrxLYNfgeBsvkHF/POtnYcZRgL tZ6syBBWs8JB4xt5V09iJSGAMPUQE8Jpdn2aRXPApdoDw179LM8Rq6r+gwCg5ZZa pGNlkgFu24WM5wC1zg4QTbMD/3MJCSxfL99Ek5HXcB3yhj+o0LmIrGAVBgoWdrRd BIGjQQFhV1NSwC8YhN/4nGHWpaTxgEtnb4CI1wI/G3DK9olYMyRJinkGJ6XYfP3b cCQmqATDF5ugIAmdditnw7deXqn/eavaMxRXJM/RQSgJJyVpbAO2OqKe6L6Inb5H kjcZA/9obTm499dDMRQ/CNR92fA5pr0zriy/ziLUow+cqI59nt+bEb9nY1mfmUN6 SW0jCH+pIQH5lerV+EookyOyq3ocUdjeRYF/d2jl9xmeSyL2H3tDvnuE6vgqFU/N sdvby4B2Iku7S/h06W6GPQAe+pzdyX9vS+Pnf8osu7W3j60WprQkUGF1bCBHYWxs YWdoZXIgPHBhdWxnYWxsQHJlZGhhdC5jb20+iFYEExECABYFAjkHP3UECwoEAwMV AwIDFgIBAheAAAoJEJECmvGCPSWpMjQAoNF2zvRgdR/8or9pBhu95zeSnkb7AKCm /uXVS0a5KoN7J61/1vEwx11poLkBDQQ5Bz+MEAQA8ztcWRJjW8cHCgLaE402jyqQ 37gDT/n4VS66nU+YItzDFScVmgMuFRzhibLblfO9TpZzxEbSF3T6p9hLLnHCQ1bD HRsKfh0eJYMMqB3+HyUpNeqCMEEd9AnWD9P4rQtO7Pes38sV0lX0OSvsTyMG9wEB vSNZk+Rl+phA55r1s8cAAwUEAJjqazvk0bgFrw1OGO9m7fEeDlvPSV6HSA0fvz4w c7ckfpuxg/URQNf3TJA00Acprk8Gg8J2CtebAyR/sP5IsrK5l1luGdk+l0M85FpT /cen2OdJtToAF/6fGnIkeCeP1O5aWTbDgdAUHBRykpdWU3GJ7NS6923fVg5khQWg uwrAiEYEGBECAAYFAjkHP4wACgkQkQKa8YI9JamliwCfXox/HjlorMKnQRJkeBcZ iLyPH1QAoI33Ft/0HBqLtqdtP4vWYQRbibjW =BMEc -----END PGP PUBLIC KEY BLOCK----- |
Exporting to a Keyserver
If you're only writing to a few correspondents, you can export your public key and send it to them personally. If there are many with whom you correspond, however, distribution of your key can be time consuming. That's where keyservers come in handy.
A keyserver is a repository on the Internet which can store and distribute your public key to anyone who requests it. There are many keyservers available, and most try to remain synchronized with each other; sending your key to one keyserver is like distributing it to them all. All a correspondent has to do, then, is request your public key from a from a keyserver, import that key to their keyring, and they're all set (a keyring is a file in which public and secret keys are kept).
| Which keyserver to use? |
|---|---|
Because most keyservers try to be synchronized, sending your public key to one keyserver is usually as good as sending it to them all. You can, however, locate different keyservers. One place to begin your search for keyservers and more information is Keyserver.Net, at http://www.keyserver.net; another location is Robert's Crypto & PGP Links: Keyservers, at http://crypto.yashy.com/www/Keyservers/ |
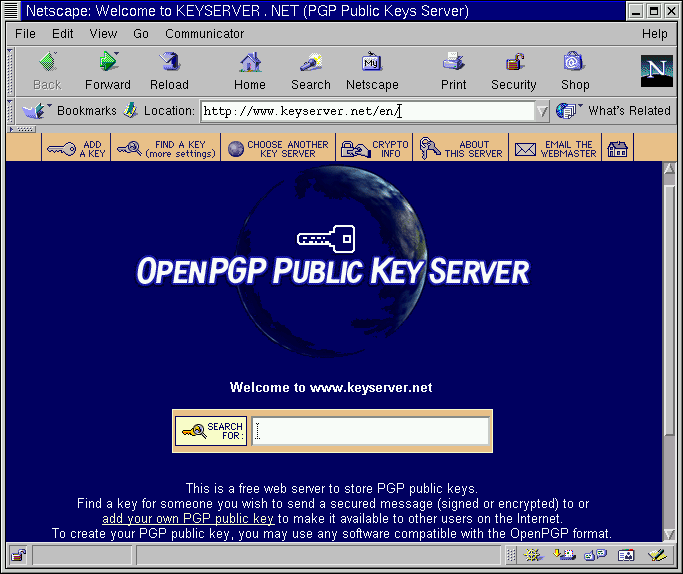
You can send your public key from either the shell prompt or from a browser (as in Figure 13-1); of course, you must be online to send or receive keys from a keyserver.
From the shell prompt, type the following:
gpg --keyserver search.keyserver.net --send-key you@yourisp.net
From your browser, go to Keyserver.Net (http://www.keyserver.net) and select the option to add your own PGP public key.
Your next task is to copy and paste your public key into the appropriate area on the Web page. Here's how:
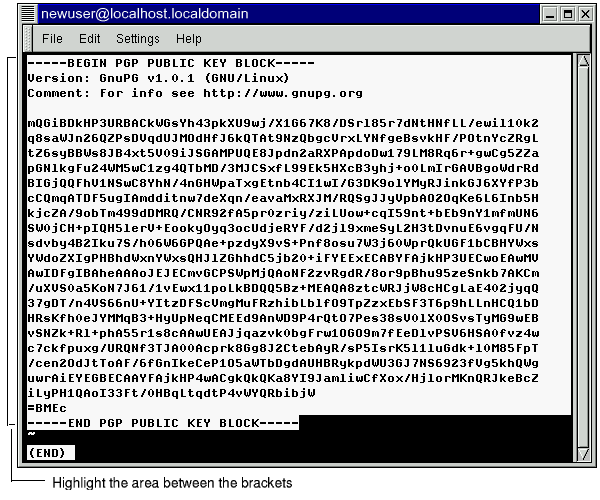
Open your exported public key file (such as mykey.asc, which was created in the section called Exporting your Public Key) with a pager -- for example, less mykey.asc
Using your mouse, copy the file by highlighting all the lines from the BEGIN PGP to END PGP notations (see Figure 13-2)
Paste the contents of the file mykey.asc into the appropriate area of the page on Keyserver.Net by middle-clicking with your mouse (or left- and right-clicking if you're using a two-button mouse). Then select the Submit button on the keyserver page. (If you make a mistake, press the Reset button on the page to clear your pasted key.)
Note that if you are submitting your key to another Web-based keyserver, the above transaction will be essentially the same.
That's it. Regardless of whether you use the shell prompt or the Web, you'll see a message that your key was successfully submitted -- either in the Xterm window or at the keyserver's website. Now, users who want to communicate securely with you can import your public key and add it to their keyring.
Importing a Public Key
The other end of key exchange -- importing others' public keys to your keyring -- is just as simple as exporting keys. When you import someone's public key, you can decrypt their mail and check their digital signature against their public key on your keyring.
One of the easiest ways to import a key is to download the key or save it from a website (as in saving Red Hat's key, for example, in the section called Importing Keys in Chapter 12).
After downloading a key, use the --import command to add it to your keyring.
Another way to save a key is to use a browser's Save As feature. If you're using a browser such as Navigator, and you locate a key at a keyserver, you can save the page as a text file (go to File => Save As). In the drop-down box next to Format for saved document, choose Text. Then, you can import it -- as long as you remember the name of the file you saved. For example, let's say you just saved a key as a text file, called newkey.txt. To import the file, at a shell prompt, type:
[newuser@localhost newuser]$ gpg --import newkey.txt gpg: key F78FFE84: public key imported gpg: Total number processed: 1 gpg: imported: 1 [newuser@localhost newuser]$ |
To check that the process was successful, use the --list-keys command at the prompt, as in gpg --list-keys; you should see your newly imported key listed on your keyring.
What Are Digital Signatures?
Digital signatures are similar to signatures -- or stamps -- you might place on a document such as e-mail.
Unlike traditional correspondence, in which it might be possible to tamper with your written signature, digital signatures can't be forged. That's because the signature is created with your unique secret key, and can be verified by your recipient using your public key.
A digital signature timestamps a document; in essence, that means that the time you signed the document is part of that signature. So if anyone tries to modify the document, the verification of the signature will fail. Some e-mail applications, such as Exmh or KDE's KMail, include the ability to sign documents with GnuPG within the application's interface.
Two useful types of digital signatures are clearsigned documents and detached signatures. Both types of signatures incorporate the same security of authenticity, without requiring your recipient to decrypt your entire message.
In a clearsigned message, your signature appears as a text block within the context of your letter; a detached signature is sent as a separate file with your correspondence (that is, detached from your message).
Where to find more information
There's more to encryption technology than can be covered in one slim introduction to GPG. Here are some resources where you can learn more:
Websites:
GnuPG: Go to http://www.gnupg.org for links to the latest GPG releases, a comprehensive user's guide, and other cryptography resources.
An Encryption Tutorial, from Webmonkey: Go to http://hotwired.lycos.com/webmonkey/backend/security/tutorials/tutorial1.html to learn more about encryption and how to apply encryption techniques.
The Electronic Frontier Foundation, "Privacy, Security, Crypto, & Surveillance" Archive: http://www.eff.org/pub/Privacy.
Books:
The Official PGP User's Guide, Philip R. Zimmermann; MIT Press, 1995
PGP: Pretty Good Privacy, Simson Garfinkel; O'Reilly & Associates, 1994
E-Mail Security: How to Keep Your Electronic Messages Private, Bruce Schneier; John Wiley & Sons, 1995